最近用Kong这个api网关做了公司一个小项目,感觉这东西真是方便,各种东西都一应俱全,实在不行还能自己改lua代码的插件逻辑,标准化的系统就是用的爽,下面就其中一个小课题的解决过程进行记录。
环境:Kong v0.14版本 Centos7 docker部署的Kong
Kong网关内实质是nginx在工作,由于访问的客户很多,接口也很多,需要使用Kibana展示访问日志,所以需要做以下工作 1.Kong网关nginx日志的log_format进行修改,记录用户信息及upstream信息等等 2.用filebeat将日志读取进来,写入elasticsearch 3.用kibana展示客户访问流量图
第一项任务,修改nginx的log_format 由于Kong网关利用openresty封装了nginx,所以不能直接改nginx的config,否则重新部署时又得来一遍,所以需要修改这个文件
/usr/local/share/lua/5.1/kong/templates/nginx_kong.lua
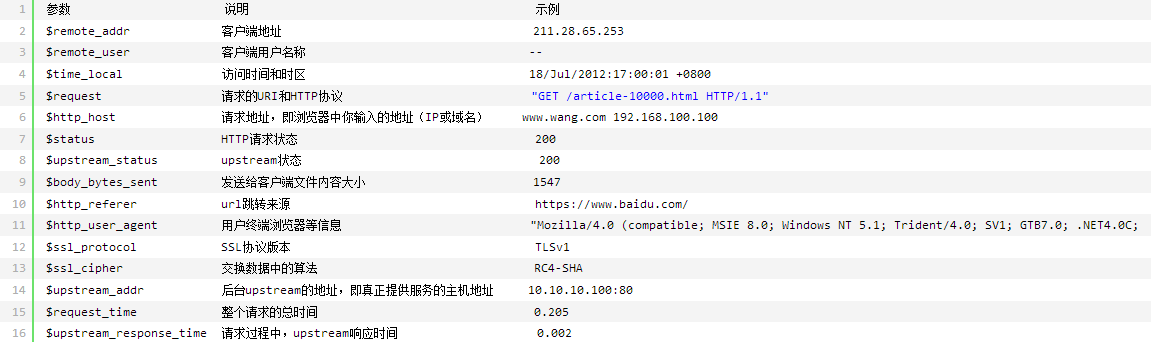
log_format mainfmt '$time_iso8601 "$request" '
'$status $request_time "$http_x_forwarded_for" $request_length $body_bytes_sent '
'"$http_host" "$http_referer" "$http_user_agent" '
'"$http_x_consumer_custom_id" "$http_x_credential_username" "$upstream_addr" $upstream_status '
'$upstream_response_time $upstream_response_length';
这里多提一下,由于我使用的是hmac插件进行用户认证,所以使用了"$http_x_consumer_custom_id" "$http_x_credential_username" 这两项配置,详见Kong的插件说明文档
https://docs.konghq.com/hub/kong-inc/hmac-auth/ Upstream Headers
When a client has been authenticated, the plugin will append some headers to the request before proxying it to the upstream service, so that you can identify the Consumer in your code:
X-Consumer-ID, the ID of the Consumer on Kong
X-Consumer-Custom-ID, the custom_id of the Consumer (if set)
X-Consumer-Username, the username of the Consumer (if set)
X-Credential-Username, the username of the Credential (only if the consumer is not the ‘anonymous’ consumer)
X-Anonymous-Consumer, will be set to true when authentication failed, and the ‘anonymous’ consumer was set instead.
参考nginx的log_format说明
第二步,配置filebeat 由于filebeat已经内置了nginx的module,但和我的自定义格式不一样,因此要进行一系列修改
- 首先将fields.yml里面除了filebeat基础字段和nginx意外的字段组都删了
- 修改fields.yml,添加我需要的新字段,类型就模仿其他的照抄就行
- 修改日志格式解释文件,将我自定义的log_format对应的格式改好
filebeat-apiv4\module\nginx\access\ingest\default.json
{
    "description": "Pipeline for parsing Nginx access logs. Requires the geoip and user_agent plugins.",
    "processors":
    [
        {
            "grok":
            {
                "field": "message",
                "patterns":
                [
                    "%{TIMESTAMP_ISO8601:nginx.access.time} \"%{GREEDYDATA:nginx.access.info}\" %{NUMBER:nginx.access.response_code:int} %{NUMBER:nginx.access.request_time:float} \"%{IP_LIST:nginx.access.remote_ip_list}\" %{NUMBER:nginx.access.request_length:int} %{NUMBER:nginx.access.body_sent.bytes:int} \"%{DATA:nginx.access.request_host}\" \"%{DATA:nginx.access.referrer}\" \"%{DATA:nginx.access.agent}\" \"%{DATA:nginx.access.user_id}\" \"%{DATA:nginx.access.user_key}\" \"%{DATA:nginx.access.upstream.addr}\" (%{NUMBER:nginx.access.upstream.response_code:int}|-) (%{NUMBER:nginx.access.upstream.response_time:float}|-) (%{NUMBER:nginx.access.upstream.response_length:int}|-)"
                ],
                "pattern_definitions":
                {
                    "IP_LIST": "%{IP}(\"?,?\\s*%{IP})*"
                },
                "ignore_missing": true
            }
        },
        {
            "grok":
            {
                "field": "nginx.access.info",
                "patterns":
                [
                    "%{WORD:nginx.access.method} %{DATA:nginx.access.url} HTTP/%{NUMBER:nginx.access.http_version}",
                    ""
                ],
                "ignore_missing": true
            }
        },
        {
            "remove":
            {
                "field": "nginx.access.info"
            }
        },
        {
            "split":
            {
                "field": "nginx.access.remote_ip_list",
                "separator": "\"?,?\\s+"
            }
        },
        {
            "script":
            {
                "lang": "painless",
                "inline": "boolean isPrivate(def ip) { try { StringTokenizer tok = new StringTokenizer(ip, '.'); int firstByte = Integer.parseInt(tok.nextToken());       int secondByte = Integer.parseInt(tok.nextToken());       if (firstByte == 10) {         return true;       }       if (firstByte == 192 && secondByte == 168) {         return true;       }       if (firstByte == 172 && secondByte >= 16 && secondByte <= 31) {         return true;       }       if (firstByte == 127) {         return true;       }       return false;     } catch (Exception e) {       return false;     }   }   def found = false;   for (def item : ctx.nginx.access.remote_ip_list) {     if (!isPrivate(item)) {       ctx.nginx.access.remote_ip = item;       found = true;       break;     }   }   if (!found) {     ctx.nginx.access.remote_ip = ctx.nginx.access.remote_ip_list[0];   }"
            }
        },
        {
            "remove":
            {
                "field": "message"
            }
        },
        {
            "rename":
            {
                "field": "@timestamp",
                "target_field": "read_timestamp"
            }
        },
        {
            "date":
            {
                "field": "nginx.access.time",
                "target_field": "@timestamp",
                "formats":
                [
                    "ISO8601"
                ],
                "timezone": "Asia/Shanghai",
                "ignore_failure": true
            }
        },
        {
            "remove":
            {
                "field": "nginx.access.time"
            }
        },
        {
            "user_agent":
            {
                "field": "nginx.access.agent",
                "target_field": "nginx.access.user_agent"
            }
        },
        {
            "rename":
            {
                "field": "nginx.access.agent",
                "target_field": "nginx.access.user_agent.original"
            }
        },
        {
            "geoip":
            {
                "field": "nginx.access.remote_ip",
                "target_field": "nginx.access.geoip"
            }
        }
    ],
    "on_failure":
    [
        {
            "set":
            {
                "field": "error.message",
                "value": "{{ _ingest.on_failure_message }}"
            }
        }
    ]
}
- 接下来修改filebeat默认读取的日志路径(注意这个是我把kong的日志改地方了才需要这一步骤)
filebeat-apiv4\module\nginx\access\manifest.yml
module_version: "1.0"

var:
- name: paths
default:
- /var/log/kong/access.log*
os.darwin:
- /usr/local/var/log/kong/access.log*
os.windows:
- c:/programdata/kong/logs/*access.log*
- 修改filebeat.yml,配置好es,kibana等信息
#==================== Elasticsearch template setting ==========================
setup.template.settings:
index.number_of_shards: 3
#index.codec: best_compression
#_source.enabled: false
#这里设置es建立索引的模板名和字段文件
setup.template.name: "apiv4-access"
setup.template.overwrite: false
setup.template.pattern: "apiv4-access-*"
setup.template.fields: "/root/filebeat-apiv4/fields.yml"
#============================== Kibana =====================================
setup.kibana:

host: "x.x.x.x:5601"
#-------------------------- Elasticsearch output ------------------------------
output.elasticsearch:
# Array of hosts to connect to.
hosts: ["x.x.x.x:9200","x.x.x.x:9200"]
index: "apiv4-access-%{+yyyy.MM}"
# Enabled ilm (beta) to use index lifecycle management instead daily indices.
#ilm.enabled: false
这里还有一个小插曲,整个filebeat目录里面其实包含了kibana图的创建模板,如果字段名或es的索引名被改变了,则需要整个filebeat目录搜索索引名,需要批量修改一下
-
最后将module.d目录下的nginx模块的disable目录扩展名删掉,就算启用nginx模块了
-
接下来需要让filebeat设置一下es和kibana的信息,执行
./filebeat setup -e
就设置好啦
-
然后运行
nohup ./filebeat -e &
让filebeat持续监控即可
在研究期间,曾经多次有配置错误的情况,这时要到es里删掉pipeline,template和index,方法如下
先停掉filebeat
DELETE /apiv4-access-2019.04  -------删索引
GET _ingest/pipeline -------看pipeline,找到自己的pipeline叫什么名字
DELETE _ingest/pipeline/filebeat-6.6.1-nginx-access-default  -----删自己的pipeline
GET _template  -----看template,找到自己的template叫什么名字
DELETE _template/apiv4-access  -----删template
 都删完了,就可以再执行一次
./filebeat setup -e
nohup ./filebeat -e &
接下来kibana关于nginx的图应该可以看了,如果不能看就是Patterns 没做好,依次进入management->Index Patterns 对自己的索引建立Patterns ,之后就可以在kibana看数据和做图啦!